
There's something peculiarly satisfying about tuning in to Radio 4 on a Bush radio that's older than you are. The warm glow of the dial, the slight hiss between stations, the sound quality that modern digital equipment somehow never quite matches. Vintage radio restoration lets you experience that, and it's more accessible than you might think.
But before we go further, let me be blunt about something: these radios can kill you. Valve sets operate with voltages between 250V and 400V DC. That's enough to stop your heart. Everything I'm about to describe assumes you're taking proper precautions. If you're not confident working with mains electricity, find someone who is.
Safety, seriously
Never work on a powered radio. Always unplug it and wait for capacitors to discharge. Large electrolytics can hold charge for days, so use a discharge probe before touching anything inside. An isolation transformer protects you from direct mains connection and is worth the investment. The old-timer's trick of keeping one hand behind your back while testing has saved lives by preventing current from passing through the heart. And please, don't work alone when testing powered equipment.
Right. With that established, let's talk about actually doing this.
Finding a project
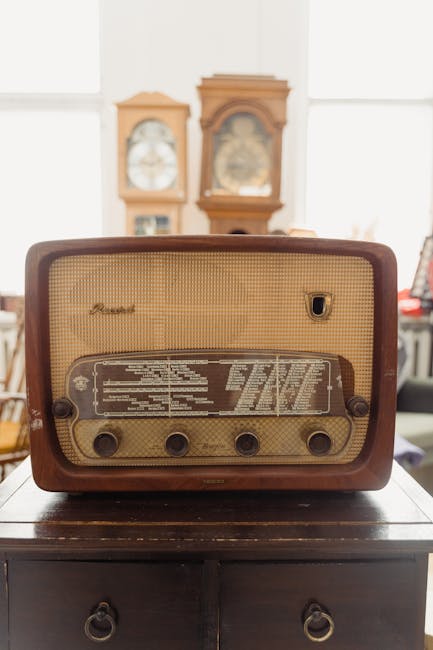
The UK has wonderful history in radio manufacturing. Bush, Ekco, Murphy, Pye, and dozens of smaller makers produced beautiful sets from the 1930s through the 1960s. You can find them at antique shops, car boot sales, house clearances, and increasingly through our electronics listings.
For your first project, look for something complete. Missing valves or transformers can be expensive to source, and while you can find most common types, some are scarce. Undamaged cabinets are a plus, since wood and Bakelite repairs require skills that take time to develop. Popular models have better documentation and more people who've already solved whatever problems you'll encounter.
If a radio partially works, that's actually encouraging. It means the major components are functional and you're probably looking at capacitor failure rather than something more fundamental.
The restoration process
Start with a visual inspection. Look for obvious damage, burnt components, bodged previous repairs. Check for overheating signs around resistors and transformers. Examine the mains cable for perished insulation, because original rubber insulation crumbles with age and becomes dangerous.
Capacitors are almost always the first thing to address. Old wax and paper capacitors fail with age, and when they fail they leak current in ways that damage other components. Replace them. Electrolytic capacitors can actually explode if they've dried out, so either replace them or reform them carefully by gradually applying voltage. Mica capacitors are usually fine unless they're obviously damaged.
Check resistors with a multimeter. Carbon composition resistors drift upward in value over time. If something's drifted more than about 20% from its marked value, replace it.
Valves themselves often last decades, but they do eventually wear out. Test them if you can, either with your own valve tester or through a local radio club. Don't assume they need replacement just because they're old.
For the first power-up after your safety work, use a variac to bring the voltage up slowly while watching for problems. This gentle approach lets failing components reveal themselves without the drama of sudden failure.
Cabinet restoration
The cabinet is often what makes a vintage radio special. British manufacturers produced beautiful wooden cabinets in walnut, oak, and mahogany, as well as innovative Bakelite designs that still look striking today.
With wooden cabinets, clean gently using appropriate wood cleaners. Veneer damage can be repaired if you can source matching material. Original finishes were typically French polish or lacquer, and if you're going to refinish, matching the original technique matters both for appearance and for value. That said, patina has value too. Over-restoration can strip away the character that makes old radios appealing.
Bakelite is more forgiving in some ways. Clean with mild soap, avoiding anything abrasive that might scratch the surface. Brasso can restore shine to dulled material. Cracks are trickier, since Bakelite doesn't glue well, but specialist adhesives exist.
Common problems
No sound at all usually means checking the obvious first: mains fuse, valve heaters (they should glow), speaker connections. Test the output transformer for continuity.
Weak or distorted sound typically indicates failing capacitors, worn valves, or misalignment of the intermediate frequency section. Realignment needs a signal generator and some expertise, but capacitors and valves you can address yourself.
Excessive hum points to failing electrolytic capacitors in the power supply. Start there. Crackle and noise often come from dirty valve bases, corroded volume controls, or failing resistors. Contact cleaner helps with the first two.
Getting involved
The British Vintage Wireless Society is the main organisation for collectors and restorers, and joining connects you with people who've been doing this for decades. The Vintage Radio Forum has an extensive knowledge base covering most common sets. Regular radio fairs give you opportunities to find parts, meet enthusiasts, and see restored equipment.
There's something special about bringing these old sets back to life. They were built to be repaired, designed in an era when radio engineers expected owners to take the back off and poke around. With patience and appropriate caution, you can join a tradition of restoration that goes back to the early days of broadcasting.
If you're looking for a project, browse our electronics listings or check out our guide to sourcing parts for vintage restorations.